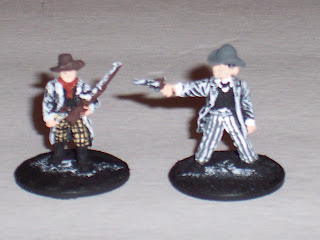
Painting 'Now' Technique(s)
I was reading about a different painting technique and decided I'd give it a go on my 28mm wild west figures. Essentially the process is this:
1. Prime the miniature black.
2. Dry brush the figure with white. (black will remain in all the low spots.)
3. Paint your figure with a layer of color(s).
4. Add a layer of lighter shades over the base color.
5. Dry brush white over the top to highlight the uppermost details.
The result is a figure that shows a better amount of shading and highlighting than I am used to doing. (progress pics to come soon showing the stages.) The results have eliminated the need to do a dark wash and the shadows are still in the appropriate places.
Painting 'Past' Technique(s)
Here is how I've painted my miniatures in the past:
1. Prime the miniature. (Black, White, or Gray. See notes below.)
2. Paint your figure with a layer of color(s).
3. Add a layer of dark wash (thinned down black or brown paint and water) to get some shadows in the low spots, folds, and etc.
4. Add a layer of lighter shades over the base color.
5. Dry brush white over the top to highlight the uppermost details.
Selection of Primer Color:
Here are a few colors to choose from:
White: All of my early figures, 15mm and some 25mm, were painted white. This was because they were 15mm ACW and Napoleonic figures, and 25mm Star Wars with brightly colored uniforms. The white base coat makes the colors come out that much more brighter.
Black: I now paint all of my figures with a black base coat. I started with my 20mm WWII skirmish figures and carried it through to all of my newer 10mm Zulus, and 28mm ACW, Seminole Indian, and other skirmish figures. The black base coat tends to dull the colors somewhat, giving them a muted/dirty/used tone, exactly what I wanted for those time periods.
Gray: I tried to use a gray base coat, but I just didn't like the results, not to mean that you won't. It gives a result somewhere between white and black. Some of the pro-painters swear by it?
Painting 'Future' Technique(s)
With this 'new' technique, at least to me, I've eliminated the dark paint wash step. I keep reading about doing ink washes and I know some live by it. I'll probably give it a try on some future miniatures and will report on the results.
Here's some pictures of my Deputies in Progress using my 'New technique'.
(Color Schemes are taken from 'Pale Rider')
#1: The Primed Black Figures.
#2: The figures are dry-brushed white.
#3a: Color being added to the figures, under-layers first.
#3b: Color being added to the figures, outer layers second.
#4: Additional lighter shades & highlights.
#5: Final shading. (Coming Soon.)
#6: Bases, flocking and details. (Coming Soon.)
#6: Bases, flocking and details. (Coming Soon.)


I am a gray primer cultist. I use gray because it is a neutral color and doesn't affect the values of the paints going on top of it. It neither dulls or brightens the color. The primer is there to provide tooth for the paint and nothing more.
ReplyDeleteGlad to hear there are some 'gray' cultists out there. I like the fact of getting a 'two-for' out of the black primer as (1) a base coat for the paint and (2) to add some 'depth' to the paint job without having to do the darker washes.
DeleteIf I was doing some competition painting, I might reconsider it.
Hi David,
ReplyDeleteGreat blog you have here that I found today.
Just judging by the online pictures, I would say that the final highlighting is overdone. I would dry out the brush more and go with just a touch of highlight showing.
Forgot to add that I also use black primer. And I had thought about dry-brushing with white, but had not done it. But seeing how your work turned out will encourage me to do it next time I pick up a miniature to paint.
DeleteThis was the first time that I tried the white drybrush over the black primer, and I liked it a lot. Normally on 28mm & 20mm figures, I just primed it black and started painting.
DeleteFor 15mm figures, I still prime them white and then paint, so that the bright colors pop even more on the unique uniforms of the the ACW, Nap's, and AWI.
David G.
Thanks for the comments. It is probably 'too much' highlighting, but at 2 feet+, it doesn't look bad at all. Also, the flash in the picture probably makes the miniature look a lot lighter than it really is. I need to really make a light box to photograph the miniatures better.
ReplyDeleteDavid G.