I set this up so that I can ramble on about my lead (and plastic) mountain, my endless gaming, miniature, and terrain projects, and other

insights into various games.


You'll find lots of 'pretty pictures', various modeling techniques, and hopefully some inspiration for your own lead pile. You're bound to

find something amongst my games and photos that interests you.


Sit back, open a cold one, and enjoy.


If you need something, feel free to contact me at: dglennjr at yah00 dot com


Showing posts with label BAB. Show all posts

Saturday, June 2, 2012

20mm D-Day Invasion: Omaha Beach

In honor of the upcoming anniversary of the D-Day landings, our local gaming group hosted a large 20mm game, using the Brother Against Brother, WWII Variant rules.

The terrain was quickly thrown together as I hadn't constructed my Atlantic Wall terrain yet.  (Simple green sheets over stacked styrofoam, paper models of concrete bunkers, rocks, and some lichen.)  We did however try a couple of different terrain techniques, such as using real sand (about 6 pounds of it) for the beach...sort of creating a mini-sand table.  The terrain set up quickly, since I want to run this at future conventions. The Scenario is not an actual OOB, yet, but certainly gave the feel.  The terrain was meant to represent the Omaha landing, somewhere between White and Green Beach, with three fortified bunkers and two draws into the terrain.

The Allied invasion started with about 10, 12-man units ('squads') in various landing craft, two engineering Shermans, and 3x DD Shermans with engineering units.

The German defenders started with about 4, 12-man units ('squads') with plenty of MG's, 3 AT guns in the bunkers, and plenty of defensive positions.

Here are some pictures of the game and the progress of the invasion:

 Here's the initial setup form the west end of the beach. Note that the seawall was also 'formed' form the sand, so no extra terrain.  There was also some crude barbed wire coils that I made the night before.  Better barbed wire (with barbs) is coming soon. I've got lots of hedgehogs, most made with plastic-styrene angles glued at the proper angles.

 Here's a look at the beach from the east end. Note the craters in the sand, created by making a little mound of sand, and then crushing it with a golf ball to make the crater with raised sides.

 We never had to use it, but I had to take a picture of my P51's (1/72nd Corgi die cast) over the beach.  See one of my recent posts on how I made the new flight stands.  

 Here was have the landing craft making their way to the beach in relatively good order.  The middle LCM-3 is taking hits from a German mortar and causing many pains for the crew and landing party.  One of the DD Shermans at the extreme left rolled badly and began to flood, creating a water obstacle for later landing craft. The tanks crew did manage to bail out successfully and hitch a ride on a passing LCVP heading back to the LST for the second wave.

 The center units are taking a murderous fire form the German MG's above. Once DD tank is ashore  while the Engineering Sherman prepares to land. The LCM-3 in the background is now sinking and ablaze with the entire landing party as a casualty.  There were no survivors.

 Here's another view of the entire beach. Alpha and Bravo company have reached the seawall in the foreground relatively unscathed. The Engineering Sherman dozer is on the beach.  The DD Sherman that hit the beach took a critical hit to the engine from a German Pak-40.  It will veer to the left and come to a stop...a mobility kill, and sitting duck. In the background, the other engineering unit, a Sherman Crab tank is on the beach flailing away. (However, the mines are on the 'other' side of the seawall !)

 Several more units have made it to the seawall, however with fewer numbers than when they started.  The Sherman crab is advancing as well as another DD Sherman, with AT shells falling around them both.

 Another good view of the battle.  Finally, one of the Shermans successfully placed a smoke round in front of the central bunker.

On the extreme left, the troops look at the draw they have to assault.  They are keeping the dug-in Germans suppressed with gunfire.

 
On the extreme right, the troops are evaluating the draw they have to cross.  German casualties are mounting and the MG fire is slackening from the heights.

 The stationary troops along the seawall start putting together their bangalore torpedoes and strategically place them through the seawall.  There will be a big 'bang' the next turn. 

 On the left, the engineering squad blows a hole in the seawall, and the Sherman crab proceeds through the breech.  The infantry also proceeds as their exploded bangalores have created a line of rifle pits to enfilade the German rifles above.

 Another view of the Allied left. A couple of straggling landing craft make it to shore with reinforcements to take advantage of the breach.

 On the Allied right, they have blown three new breaches through the sea wall and the Sherman dozer is about ready to make a 4th.  A few well placed shots and an HE round have all but silenced the German MG fire along this draw.  Alpha and Bravo company should make it to the top of the defenses first. "Dog three is now open!"

Here's one last picture of the beach assault before the game was called as there were very few Germans left on the ridges to return fire. The Germans did well to inflict almost 70 casualties (53%), disable one DD-tank and sink one LCM-3. Fun was had by all, and with a couple of modifications, it should make for a lively convention game.

Friday, May 25, 2012

Skirmish at Thlo-no-ta-sassy River (Flintlake Creek), Take two.

(Woohoo, post #100 and counting!)

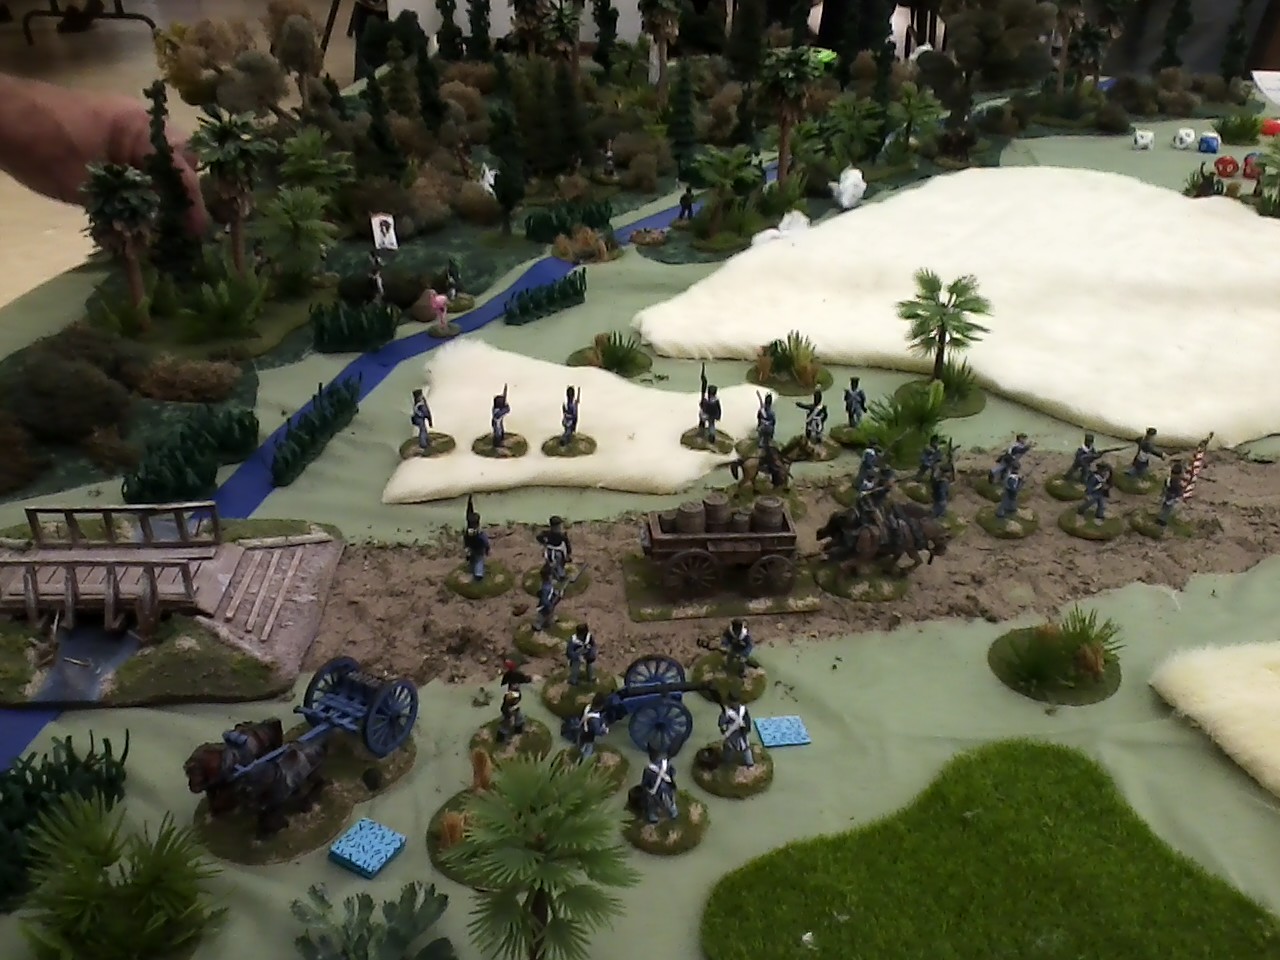
Here is another game of the Battle of "Flintlake Creek" using the Brother Against Brother (BAB) rules.

The US detachment abandons Fort Alabama (Fort Foster) and heads south along the Fort King Highway to Fort Brooke (Tampa, FL). On April 27, 1836, as the column of troops cross the Thlo-no-ta-sassy River (Flintlake Creek) and into an open prairie, Seminoles hidden in the creek bed open fire on the regulars.

 Mistake #1: The U.S. troops slow down, and deploy on the flanks, on both sides of the river, rather than keep moving to the other end of the board.

 The Seminoles are about to open a severe volley into the U.S. troops investigating the woods on the left.  The lone Florida Militia unit doesn't realize that they area about to be wiped out by a lethal round of Seminole rifle fire.

 Seminoles are swapping shots and withdrawing further into the woods. As a variant with this set of rules and Seminole tactics, the Seminoles have degrading fire (an additional -1 cumulative) each turn they fire to represent the fouled guns and lack of ammo support.  Therefore, their rifle fire is essentially useless after 3 shots, but can still fight in deadly hand-to-hand fighting.

 Again, more wasted time by the U.S. troops as they unlimber the gun, load it, and then fire it.
(A 3-turn process.) 

 A unit of hidden Seminoles rises up out of the grassland prairie to fire on the approaching 'white man'.

The only Melee of the game. After receiving casualties, the U.S. troops were able to break contact and shoot down the remainder of the Seminoles as they were relatively stuck where they were, loading and firing, while their squad leader was dead.  

A good volley fire by the U.S. troops attempts to clear the road to the front. The U.S. will end up with a marginal victory and wagons full of wounded as they make their way south towards Ft. Brooke, located adjacent to Tampa City.

Recent ACW Yankeetown Raid

As typical during the ACW, there were hundreds of small scraps and skirmishes in the state of Florida.  Most involved shore or river landings of Union Sailors, Marines, Dismounted Cavalry and sometimes Regular Infantry.  This game, run at a local 'games day', represents a typical inland skirmish as Union troops search the Rebel interior for stores of contraband and other military supplies while fighting off the local Militia or Florida reserves.

(Please excuse the unfinished ACW troops.  I'm still working on the first batch of 250+ figures, but at least the artillerymen are complete.)

 The rebels have some local militia and artillery deployed in the field of this little hamlet.  Additional Confederate troops are approaching from the left (out of picture).  The main Union force is approaching from the south (out of picture to the lower right) while the USCT troops that I was in charge of start to deploy along the road on the left.

 The Main Yankee force deploys in good order while leaving a gap for the 12lb Napoleon to shoot into the rebel troops. The infantry trade shots with the militia suffering a murderous fire.

The initial volley by my USCT squads had disastrous results for the approaching confederates. (I'm sorry Jacob.) My troops did take some casualties, but not nearly as many as the Reb's did.  I couldn't roll that good again if I tried.  After the Rebel threat on this flank was checked, the squads on the right will advance across the cabbage patch towards the barn building.

Here, a Union Company, after failing their morale check, was forced to charge the nearest enemy which was the decimated Florid militia unit behind the fence.  The Reb's were routed off the field and the Union unit didn't quite make it to the Artillery in the field. However, continued Union fire would eliminate the other Florida unit on the right and would start to mow down the CSA gunner's before they could remove the guns. A last ditch effort by a lone gunner failed to cause any additional Yankee casualties when he pulled the lanyard with his last action.

The Yanks were shot up, but there was no way for the CSA troops to retake any ground lost.  This would be a marginal victory for the Union Forces as they burn and pillage their way back to their boats while escorting captured contraband.

Sunday, April 8, 2012

Brother Against Brother-WWII variant rules (BABWWII)

I keep talking about these free rules, but had forgotten where they were located online for others to download.  Well, I found it again. Here is the link:


Here's the custom cover I made for the rules:

Sunday, March 25, 2012

28mm ACW raid into North Florida/South Georgia

Here are some pictures of a recent 28mm ACW game we ran on March 22, 2012.

The Battlefield from the north end. 

The Battlefield from the south end. 

The brown house on the hill. (It was spared from the horrors of war, this night.)

A small, rebel held hamlet in North Florida.

I thought the sunlight over the field was cool, so I took a picture.

A rocky outcropping in one corner, at the request of one of our games. (The rocks are real rocks, stacked up with some trees and lichen added.) Looks pretty good to me.

The Confederate line opens withering volley on the Union blue-bellies coming up the road. (Excuse the unfinished ACW troops.  I've got about 300 of about 500 that are in various stages of painting and detailing.)

A Union squad charges out across an open area  (mistake #1) against waiting rebels behind light cover. (mistake #2)

Confederate troops attempt to hold the wheat field fence line against the attacking Union troops.

Three companies of the 2nd USCT advance down the road from the right.

A rebel artillery battery is brought to the middle of the wheat field.  Due to some orderly withdrawls by the rebels in the center, the battery would be withdrawn as well to a second line of fences.

Some Georgia Militia enter the table and form up on the confederate right.

Three Union companies march at the double-quick down the road and encounter the rebel militia.

Both sides exchange volley's with each other.

The Union boys take a couple of casualties, but the militia takes a deafening fire that drastically dwindles their ranks.

One more volley by the Union left forces the Georgia Militia to 'Skeedaddle' off the field. The Rebels who had reformed in the center and the town, prepare to withdraw off the table after their artillery battery is silenced due to effective and deadly accurate Union musket fire.

The dice gods simply weren't with the Confederate forces this night.  

Monday, January 30, 2012

20mm WWII: BAB- Moscow Campaign: Part II.

Continuing our Moscow campaign using the "Brother Against Brother-WWII Variant", here is part 2 of our 3 part mini-campaign as the German Forces are advancing on Moscow during November-December 1941.

Part II: The Germans are advancing across the frozen rural lands located north-north-west of Moscow.  Following the rail line south, a German recon take up a defensive position in a small Russian Village while waiting for the remainder of the German army to show up.  Unfortunately, it appears that the German support troops are lagging quite a bit, perhaps held up by ice and snow issues. The Russians troops are putting up a spirited, but bloody offense to liberate the village while the Russian Armored Battalion races north, parallel to the railroad line with little resistance or opposition.  

Here's the Russian Front.  The Russian enter along the southern edge (on the left) and the Germans enter along the northern edge (on the right).

 A view of the Russian village. There are a couple of squads of Germans reinforcing and hiding inside the various buildings, setting up effective fields of fire.

 Here comes the Russians.  A two-pronged, massive assault by the Russian infantry.  Group 1 is heading to liberate the German held Russian village.  Group 2 is heading for the copse of trees in the center. The armored car and infantry will be used to 'plug' any holes.

 The Russian infantry assault is not going well.  Heavy casualties have staggered the initial wave with limited German casualties.

 Meanwhile, in the center woods, the advancing Russian infantry has stumbled into some waiting German Infantry, hunkered down at the crest of the wooded hill.

 The Russian armor with tank riders, races across the open snow, unopposed.  Lucky for the Germans that they are ignoring the infantry battles.

The second wave of the Russian Infantry attack tries to scoot to the flank of the town.  They were doing better than the first wave, until the German armor appeared in the town, with machine guns blazing. That could be why the Russian tanks couldn't find any German armor?

Coming soon: Part III, The urban battle.