I set this up so that I can ramble on about my lead (and plastic) mountain, my endless gaming, miniature, and terrain projects, and other

insights into various games.


You'll find lots of 'pretty pictures', various modeling techniques, and hopefully some inspiration for your own lead pile. You're bound to

find something amongst my games and photos that interests you.


Sit back, open a cold one, and enjoy.


If you need something, feel free to contact me at: dglennjr at yah00 dot com


Tuesday, July 31, 2012

Here comes the Clone Army to a quadrant near you...

Here are some pictures of my Clone army to date.

 These are all of the larger vehicles. The black base vehicles are all from WOTC.  The AT-RT's (left) are Micromachine/Titanium Toy miniatures.  The Assault Tank (left) is a Transformer/vehicle.  The AT-TE (right) is another Transformer/vehicle while the other AT-TE (center) is an Action Fleet vehicle.  The Turbo Tank (Rear) is a Play set.  The Republic Gunship/Transport (center) is another transformer/Vehicles.  The other 2 gunships (left and right rear)  are metal die-cast Titanium vehicles.     

 These are all of my Clone Troopers (WOTC), including specialists, commandos and etc. 

Here are more of my Jedi Knights (WOTC), in addition to all of the metal ones that I have. I certainly have enough Jedi for the Battle of Geonosis!

My Droid/Speratists Army...

Here are some pictures of my Droid army to date.

 Here are all of the oversized vehicles.  Most are from WOTC (Black Bases).  The MTT (upper left) is an Action Fleet vehicle.  One of the AAT's (left) is a Transformer/vehicle and the other AAT (Right) is an Action Fleet remote control vehicle.

Here are all of the ground forces that I have including battle droids, security droids, super battle droids, commando droids and General Grievous with his guards, and the Viceroy. (All WOTC)

Monday, July 16, 2012

20mm, 1983 Grenada/Cuba Moderns Project

Once again, I have been busy painting and flocking as of late. Here are my latest 20mm metal Cuban soldiers ready for assignment on the Island of Grenada. They are a mix of 20mm Stan Johansen Miniatures and some other metal miniature cubans.

 This is a unit of Cuban workers that have been trained to use weapons for 'self defense'. These men were responsible for the construction of the Point Salines Airstrip on Grenada.

 This is a unit of Cuban Revolutionaries.  They are ready to defend their position against any hostile invader to the Island of Grenada.

Here's another unit of Cuban Infantry, well trained and well armed for 'defense'.

The last miniatures are a couple of the Russian "Advisers" assisting the Cuban work crews.  It certainly looks like the officer on the right has a map of the Point Salines Airport on the southwest corner of the Island of Grenada.  These miniatures are from Stan Johansen Miniatures.

Falkland Islands: Argentinean Forces, 20mm modern

I don't have any 'real' Argentinean miniatures, but these will have to do for now.  They can also double as Cuban elite/marines for a future Grenada game or any other modern, Central or South American disturbance that I create.  The metal miniatures are part of the 'Merc' line of miniatures from Stan Johansen Miniatures.

Since my AA7V, from Dragon Models, doesn't have any US markings on it, it is on loan to the Argentinean forces to patrol Goose Green or any other small Falkland hamlet.  I still need to find at least one AML-90 Panhard Armored Car for the Argentineans' use .

We'll call these 'Echo' Company.  They have a typical olive drab uniform, web gear, blue berets, and a mix of weapons.  They can easily serve with just about any army, including Argentina, Cuba, Russia, and even the U.N.

 A close up of the 'Blue Berets'.

We'll call these 'Foxtrot' Company. They have a typical 3-color, tiger stripe camo uniform, olive green web gear, black berets, and a mix of weapons. I thought it was just a cool camo scheme and came out good for 20mm figures.

 A close up of the 'Black Berets'.

 We'll call these 'Gamma' Company. They have a typical 4-color, Russian camo uniform, olive green web gear, green berets, and a mix of weapons.  Again, they will serve proudly under some unfortunate dictator.

 A close up of the 'Green Berets'.

U.K. Forces in the Falklands, part 2.

I've been busy painting and flocking bases, so now my Falkland Island troops are done for the moment.

 Here's all the firepower I have so far.  The two harriers will come in handy for close ground support.   

I finally added a camo paint job to the U.K. Scimitar.  I have another U.K. Scorpion kit to put together for the rest of the British Armor support. 

I touched up the figures, gave them some drybrushing, and flocked the bases.
They are ready for duty.

20mm Modern Private Contractors

Here are some of my recently completed 20mm Private contractors (aka Blackwater) and all of the hardware at their disposal.


These guys you might recognize from the 1980's.  Can you name them all?
When I found the Hotwheels vehicle on the shelf this year, I had to get it.

 
These 'not A-Team' contractors, Fire team 'Alpha', are from Elheim Miniatures. http://www.elhiemfigures.com
From left to right you have Col. Smith, B.A. Baracus, Templeton Peck ("Face"), and H.M. Murdoch.

Here's the whole lot of my contractors and their assets.  The 12 metal miniatures are from Elmheim Miniatures. The two left most Dumvees are from Corgi Diecast. The black, Hardtop Dumvee is a Resin model.  The Humvee on the right is a Dragon, Can Do model.   In the background on the left is a Forces of Valour 'Little Bird'.  On the right is a cheap plastic army man pack helicopter ($1 for the whole pack) painted in Blackwater colors.  

Fire team 'Bravo'. 

Fire team 'Charlie'. 

Another look at the cheap helicopter. (Though I do need to make and attach a tail rotor.) 

Sunday, July 8, 2012

Some Tips on Painting...

I'm trying something new right now, so I thought I'd put down a few thoughts about the strategy for painting miniatures.

Painting 'Now' Technique(s)

I was reading about a different painting technique and decided I'd give it a go on my 28mm wild west figures.  Essentially the process is this:

1.  Prime the miniature black.
2.  Dry brush the figure with white. (black will remain in all the low spots.)
3.  Paint your figure with a layer of color(s).
4. Add a layer of lighter shades over the base color.
5. Dry brush white over the top to highlight the uppermost details.

The result is a figure that shows a better amount of shading and highlighting than I am used to doing. (progress pics to come soon showing the stages.)  The results have eliminated the need to do a dark wash and the shadows are still in the appropriate places.

Painting 'Past' Technique(s)

Here is how I've painted my miniatures in the past:

1.  Prime the miniature. (Black, White, or Gray.  See notes below.)
2.  Paint your figure with a layer of color(s).
3.  Add a layer of dark wash (thinned down black or brown paint and water) to get some shadows in the low spots, folds, and etc.
4.  Add a layer of lighter shades over the base color.
5.  Dry brush white over the top to highlight the uppermost details.

Selection of Primer Color:

Here are a few colors to choose from:

White: All of my early figures, 15mm and some 25mm, were painted white.  This was because they were 15mm ACW and Napoleonic figures, and 25mm Star Wars with brightly colored uniforms.  The white base coat makes the colors come out that much more brighter.

Black: I now paint all of my figures with a black base coat.  I started with my 20mm WWII skirmish figures and carried it through to all of my newer 10mm Zulus, and 28mm ACW, Seminole Indian, and other skirmish figures. The black base coat tends to dull the colors somewhat, giving them a muted/dirty/used tone, exactly what I wanted for those time periods.

Gray: I tried to use a gray base coat, but I just didn't like the results, not to mean that you won't.  It gives a result somewhere between white and black.  Some of the pro-painters swear by it?

Painting 'Future' Technique(s)

With this 'new' technique, at least to me, I've eliminated the dark paint wash step. I keep reading about doing ink washes and I know some live by it.  I'll probably give it a try on some future miniatures and will report on the results.


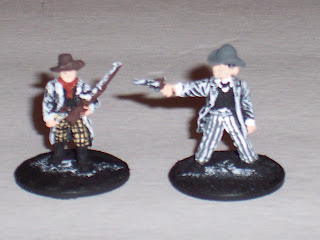
Here's some pictures of my Deputies in Progress using my 'New technique'.
(Color Schemes are taken from 'Pale Rider')

#1: The Primed Black Figures.


 #2: The figures are dry-brushed white.


#3a: Color being added to the figures, under-layers first.


 #3b: Color being added to the figures, outer layers second.


#4: Additional lighter shades & highlights.


#5: Final shading. (Coming Soon.)

#6: Bases, flocking and details. (Coming Soon.)