I set this up so that I can ramble on about my lead (and plastic) mountain, my endless gaming, miniature, and terrain projects, and other

insights into various games.


You'll find lots of 'pretty pictures', various modeling techniques, and hopefully some inspiration for your own lead pile. You're bound to

find something amongst my games and photos that interests you.


Sit back, open a cold one, and enjoy.


If you need something, feel free to contact me at: dglennjr at yah00 dot com


Sunday, October 21, 2012

Dead Walk Again: Florida Zombie Apocalypse

We recently held a 'monster' of a 28mm Zombie game.  When 6 people normally show up for our weekly game, we had 12 show up, plus myself, the Zombie Master. Luckily, I have enough survivor figures and a decent scenario, so we were able to split up the forces appropriately.

We used 2 squads of 4 police officers, 2 CDC staff, 4 Redneck clan, 4 NRA Militia types, and 4 National Guardsmen.  I had a box full of zombies and eventually deployed close to 200 of them, recycling many of them.

Here are some pics from the night (of the Walking Dead, Florida Edition) with some of the scenario background information for flavor.

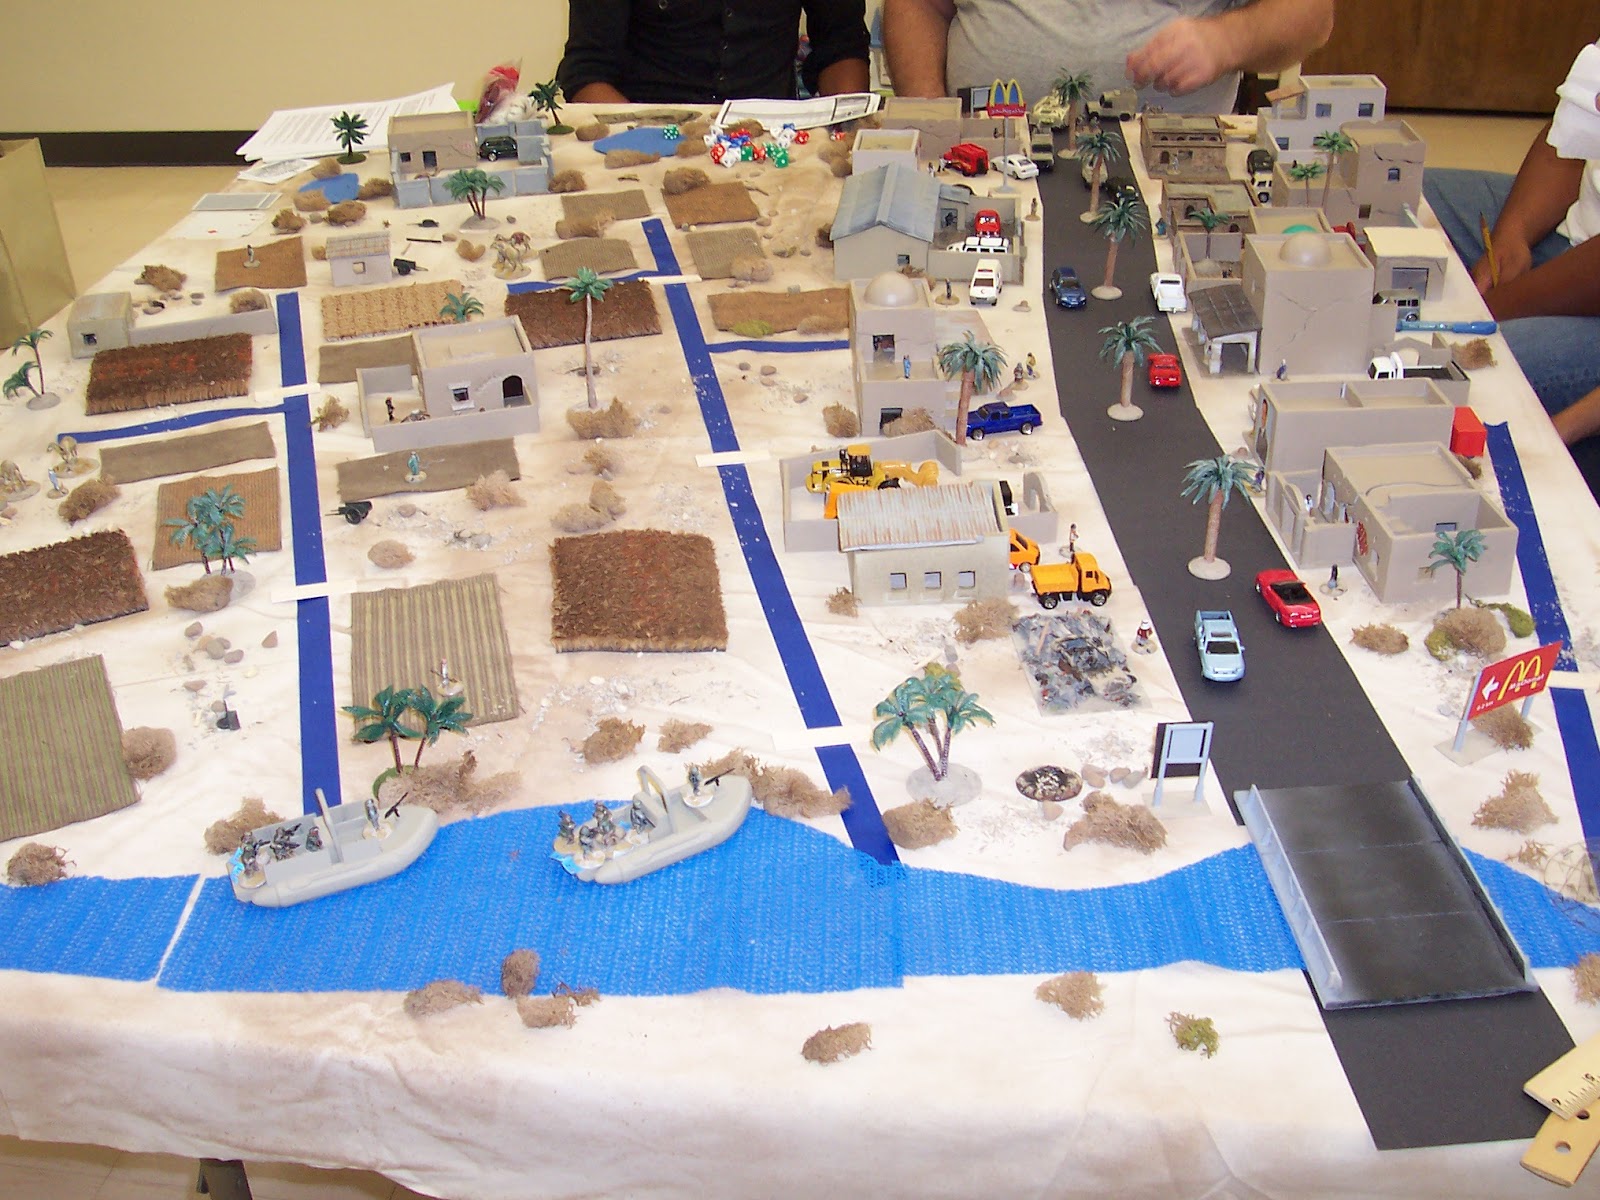
(An overview of the small Florida town in Central Florida)

Scenario: “The Initial Outbreak; Central Florida Evacuation”

October 2012

The dreaded brain disease has finally reared its ugly head.   There are reports throughout Florida that a sickness has taken over the bodies of many individuals.  These ‘hapless’ seeming people have been seen wandering aimlessly throughout the cities and towns, attacking civilians and causing overall mayhem.  Some early reports even make reference to these attacks as almost animal like, with the attackers feasting on the limbs of the victims.  Experts don’t know what is causing the ‘disease’, but say that these are ‘isolated’ incidents and no need to be alarmed.  

Local law enforcement has been overwhelmed with calls to assist the civilian population.  The Governor has called out the National Guard to assist local law enforcement agencies to deal with the menace.  A voluntary evacuation order has been issued for all coastal and central Florida areas.  The law enforcement and emergency management agencies are assisting with the evacuation as best as they can.  

 (One of the two major roadblocks on this side of town manned by the local police and 'Zombie Response Team'.)
 
Local Law Enforcement

The local city and county law enforcement agencies are manning several roadblocks in an effort to create a security perimeter around the city, to help facilitate the civilian evacuations, and eliminate any of the ‘diseased’ threats.  The officers have been instructed to shoot at any ‘diseased’ individual and protect the civilian population.  It is recommended to shoot hostile targets in the head as damage to other parts of the body seem to have had little effect.

“Attention all units, this is CDC command. There are reports that the security perimeter has been breached…be on the alert that the last helicopter….…Arrghhhh!!! No, get away…Owww…Bang-Bang-Bang!...Oh my god, I’ve been bitten…..help m…..<static>” 


(This is the other roadblock.  However, these deputies decided to jump in their Sheriff's Pickup truck and abandon their post at the first sight of a suspected zombie.) 

(The CDC has set up a Zombie Response Team Center and Civilian Rendezvous area in the parking lot of the local hospital.)  

(With the abandonment of this fortified roadblock, the zombies easily take control of the intersection and proceed up the street towards the CDC HQ.) 

(A hoard of zombies shamble towards the CDC facilities virtually unopposed.) 

(The helicopter arrives with National Guard support after some local staff members eliminated the zombie threat at the landing zone.)
Florida National Guard

The Governor issued an order calling up the local National Guard units to respond the repeated requests of local law enforcement. They have arrived via helicopter with automatic weapons and vehicles, but they are spread thinly throughout the city.  They will do their best to protect the civilian population and to defend the states security interests.  Evacuation of the CDC staff and civilians is a priority.
 

(Half of the redneck team in the Jeep are overtaken by a few zombies.  The redneck duo take out the zombies, but not before suffering a flesh wound each.  The rest of the clan is catching up in their 'Winebago' from the Kwik-E -art.  They were searching for some food supplies to satisfy their victory conditions.")
 
Polk County Rednecks

It seems that the week, poor, and drug addicted were the first to be infected with the ‘disease’.  Therefore, Polk County was one of the first counties overrun by the blight.  Luckily for this Redneck Clan from the ‘Rural Ghetto’, their mobile home was well protected from the neighborhood by tall fences and lots of guns. Seeing that their days may be numbered if they stay in the compound, ‘Pa’ has decided for the family to make a break for the city in order to evacuate the area and perhaps join some of their relatives up ‘north’ in Kentucky and Tennessee.


(Here, the Florida Militia Fanatics race through town in their HUMVEE SUV trying to find some businesses to loot for more guns and ammo to satisfy their victory point conditions.")
 
Florida Militia
 
“You can have my gun when you pry it from my cold, dead, fingers.”
The local NRA and other gun enthusiasts have seen enough inaction by local government authorities.  Therefore, they have taken up arms and are trying to evacuate the area, taking out as many ‘diseased’ individuals that they can.  Supplies are low, and they will need to acquire some supplies as they attempt to leave the city for greener, and hopefully safer pastures.
 
 
 (This police squad has since left their roadblock as well as the zombies began to outnumber them. Here, they are trying to clear a path as well as rescue/force the evacuation of some civilians in order to meet their victory point conditions.)
 
(The deputies are trying to clear a path for their truck and rescue some civilians as well.)


(The Zombie hoard proceeds towards the CDC and the loan gunman after running past the previously abandoned roadblock.  After an ill-timed gun jam, the zombies eventually overun this officer dealing some severe wounds and future zombification. 

 (A pic of the line of zombies proceeding up the street unopposed. It's like a scene out of Thriller.)
 
The final tally was two minor wounds to the Rednecks, 1 CDC staffer taking numerous wounds (future fatality), and 6 civilians eaten and turned into zombies. An estimated 120 Zombies were killed in the exchanges with the players. The PC's played very well, covering their escape and isolating herds of zombies.
 
Fun was had by all and we look forward to another Zombie game.


Sunday, September 30, 2012

Roadside Construction Zone Barrels

I whipped out some of these Construction Zone Barrels for an upcoming Zombie game to add some additional detail to some roadblocks.
 
I constructed these for 28mm miniatures, but you can easily scale them down (or up), depending on your scale of miniatures. (15mm, 20mm and etc.)
 
Here's how I made them (it is pretty simple, really.):
 
List of Materials:
 
5/8" diameter Metal Washer (Bottom)
1/2" diameter wood dowel x 3/4" high
Lego 1x1 round plate: Translucent Yellow or Orange
(You can order them individually through www.Lego.com in the 'Pick a Brick' section.)
White Glue
(Optional standard staple, see below)
 
Also:
Highway Orange Spray Paint
White paint (or white vinyl pinstriping could be used.)
Black spray paint (for base)
(Optional black (or yellow or orange) paint for the light battery box, see below)

1.  Spray paint the base washer black to represent the black rubber barrel ring.
2.  Spray paint the dowels with the highway orange paint.
3.  (optional) Paint the bottom of each round Lego with a bit of black to represent the battery box. (or orange, or yellow, depending on what you're modeling. The ones in my area are black boxes.)
4.  Paint the horizontal white striping on the barrels at about the 1/3 and 2/3 mark of the barrel height. (every 1/4" on the barrel)  "yes, hand-painting straight lines on a round dowel are possible with a steady hand."
5.  Glue the light to one edge of the top of the barrel.
6.  Glue the finished barrel to the washer.
7.  Now you have a lighted construction barrel.

Here is a typical Highway Construction Barrel:
***Some barrels have a molded handle on top.  I chose not to model this for simplicity. However, if you are really anal-retentive, you could easily make two small holes in the top of the barrel (before painting) and put/glue a standard staple in the top, letting it stick out a little to represent the handle.  Then, when you spray paint the barrel, the orange paint will give some thickness to the handle and look like it is molded onto the barrel.  


Not all barrels have to have lights. You can leave them off every other one or more.  Add some construction or warning signs and you've got a good looking detour or roadblock.

Here are the completed barrels with some recently acquired Police/Security Forces. 


I think these barrels will be convincing in my next Zombie Skirmish game.

AWI/ACW 28mm Brick Building Find @ Antique Store

I'm always browsing through flea markets, thrift stores, and antique stores as you never know what you might find that is perfect for miniatures gaming, but was not created for that purpose.  I recently found this one for $4 and bought it so I didn't violate my rules of Acquisition.
(Rule #1: Buy it when you see it, because when you come back to get it, it will be gone.) 
 
As it states on the bottom of the house:
 
"The Little House Where We Began.  This is a handcrafted replica of the Heinz family homestead designed for you to file your favorite Heinz recipes.  The house is made basswood and silk-screened by hand. " 
 
I did a quick search and you can find these for sale on eBay and such.
 
Here are some 28mm ACW figures for scale. The style of house will fit in fine with the AWI through the ACW and beyond.  You could add additional details if you wish, but I'm leaving it as is and spend that extra time on other terrain projects.  Though, as I can't leave 'good enough alone', I'll probably end up adding some shingles to the roof made from cereal box cardboard.   


The cool feature is that the roof is removable and you can fit a whole squad of 10 figures inside (if mounted on 1" bases.) 

This building will be put to good use in upcoming black powder skirmish games. I'll bet you that the creators at the Heinz company never thought the recipe box would be fought over by small metal miniature soldiers.

Saturday, August 25, 2012

15mm-20mm-1/72nd Modern vehicles: $5 find at Big Lots

I found these $5 diecast and plastic sets at Big Lots: Army, Police & Rescue

 This one has a small helicopter (10mm-ish), a car (15mm-ish), and a fire truck (15mm-ish).  This set is probably the least useful and didn't purchase it.
 
This one has a helicopter (15mm-ish), a transport truck (20mm-ish), and a 6x6 armored vehicle (15mm or 20mm-ish) similar to a TPz Fuchs APC.  The 2 vehicles will end up in my 20mm modern collection.
 
This one has a helicopter (15mm-ish), a Hard top Humvee (20mm-ish), and a 6x6 armored vehicle (15mm or 20mm-ish) similar to a TPz Fuchs APC.  I'm going to add the two wheeled vehicles to my 20mm police force and zombie eradicators. 

20mm Modern: Iraq roadsigns and billboards, pt. 2

Here's a follow up to an older post. http://www.blogger.com/blogger.g?blogID=8660015160105754358#editor/target=post;postID=4463549177017288168

Here are the pictures of some of the finished road signs and billboards.

The local MaDonal's Restaurant, with appropriate Arabic signage. 

Here is the frame work for the signage.  Plastic tubing for most of the uprights and horizontal framing.  Flat, metal bases used for the signs.  

When attaching to the base, I use a 3/16" diam. hollow plastic tube glued to the metal base.  The vertical, upright post is a 1/8" diam. plastic tube that fits nicely into the hollow 3/16" tube. A flat, metal plate (metal base) is glued vertically to the plastic framework. 

 The signs are color copies onto paper that are then stuck to a sticky magnet (with peel off adhesive on one side). The signs then can be placed at will on the vertical metal plates on the signs. (I have a lot more signs than actual sign stands.

Here's an Iraqi billboard for Iraqi Airways.  

Typical street signs add flavor to a game, especially if you're trying to find somewhere specific, like Kuwait City or Baghdad. 

The Allied troops spend a lot of time on highways and byways and are often attacked there.  So, you always need some of these.  

 Gotta know where everything is.  Look, there's a MaDonal's up ahead, 0.2km to the right.  I'm feeling the need for a McShake.

20mm Modern: Operation Plymouth Rock, November 2004, Iraq

Here was a recent game that I've been wanting to run and get to use my recently completed 20mm U.K. forces.  I ran the game at a local gamesday, sponsored by the Suncoast Skirmishers gaming group in Temple Terrace, FL.

The scenario is based on the "Operation Plymouth Rock" which began in late November, 2004.   It was a joint operation between U.S. and U.K. forces to clear out any insurgency and bring stability to the norther Babil Province and the city of Yusufiya in Iraq.

In this scenario, The U.S. forces arrive amphibiously by rigid boat and AA7V's from the Eurphrates River and the U.K. forces arrive by land into Yusufiya.  The terrain is a mix of irrigation canal fed agricultural land and the built up areas of Yusufiya.  The object is for the allied troops to seek out/take possession/destroy any insurgent strong points.  The insurgents were instructed to protect their four major objectives/strong points that included a planning/operations facility, a money laundering/financing facility, a weapons cache, and a bomb making facility. Each of these were represented by a special terrain marker for each, often used for these games.
 
Here's an overview map showing what the Yusufiyah area of Iraq looks like.
 
 Here's the map board from the British 'land side'.
 
 Here's the map board from the U.S. 'river side'.  The bridge at the lower right crosses over the Euphrates River. 
 
A look at the agricultural filed side of the table.  Note the various irrigation canals feeding the fields. There are a few wooden footbridges for people to cross the canals.
 
The Marines have landed.  U.S. troops disembark their rigid boats and the AA7V comes out of the river.

 The British are clearing out the town slowly, building by building.  The troops make sure the local MaDonal's restaurant (Iraqi McDonald's) is all clear, and taking a few Big Mac's with them.
 
 The U.S. squad on the right stumbles upon a radio controlled IED. (See the insurgent behind the wall with the transmitter?) Luckily, only 1 severe wound and several minor wounds are received and are able to proceed. The severely wounded Marine is placed in the back of the AA7V until a medivac can be brought in.  The squad to the left, heads across a footbridge to clear a building on the other side of the canal. (The U.S. would suffer their first KIA trying to clear this building.)
 
All 'hell' breaks out when the British contingent hits this walled compound.  First, gunfire from the lower right corner of the building hits a U.K. soldier next to the Landrover Snatch. Second, an RPG fired at the Warrior IFV from inside the compound, misses it's target, flying off harmlessly. Third, other automatic gunfire erupts from the compound hitting the less than armored Landrovers on the street.  A couple of casualties are caused and a gunner in the Landrover Snatch is the first U.K. KIA. Lastly, in an effort to 'run the gauntlet', an insurgent technical truck rams the front gate and hits a Landrover WMIK in a glancing blow with minimal damage to each vehicle.
 
 
Now, it's the British turn. The U.K. troops return fire, killing and wounding most of the Insurgents engaged, including the RPG firer. The UK Warrior lights up the Technical truck, turning it into a piece of Swiss cheese with four wheels and forcing it out of control into a Mosque building and vehicle across the street. (Which was supposed to be one of the insurgents 'get-away' vehicles.) 2 insurgents in the vehicle are KIA and another is severely wounded.
 
On the back side of the building, three U.K. troopers decide to toss grenades in windows to finish clearing the building.  Go figure that the last trooper rolls a critical miss, the grenade bounces off the window frame and behind him. Luckily it fell just out of range to do any damage to him or the rest of the squad. (see the white puff) 
 
 The U.S. squad enters the courtyard and proceeds to clear out the building with the AA7V providing some covering fire and protection.  4 more insurgent KIA's, including the triggerman for that earlier IED.
 
In the end, the insurgents (3 players with 6 squads) were far too spaced out to support each other effectively.  Additionally, the allied troops got to see first hand why the body armor and Kevlar helmets they are wearing are so important.  There would have been numerous additional allied KIA if it weren't for the armor saves. 
 
The final tally was:
 
U.S.: 1 KIA, 2 severe wounds, and a few minor wounds.
UK.: 1 KIA and a few minor wounds.
Insurgents: 18+ KIA and several severely wounded.


Monday, August 6, 2012

20mm Modern MCV-80 UK Warrior

In order to compliment my detachment of modern British soldiers for duty in Iraq and Afghanistan 20mm games, I have finally completed two Warriors (1/72 plastic kits).  Now I can move some of the British troops around the table-top in Armored Style.

 I painted one up in typical desert/invasion colors.  The other I painted with an interesting camouflage pattern based on an existing Warrior picture I found.  I still have to add some highlighting to both pieces.  

 To make things a little bit more interesting, I've been toying with the idea of using the plastic canvas material (10 squares per inch) to make inexpensive RPG skirts.  There aren't many commercially available options and they are usually made from etched metal and run a small fortune to buy.
I simply cut out the appropriate shapes, and removed some of the vertical ribs (this is the most time consuming part of the process) to give it the horizontal lines that most RPG skirts have.  One sheet cost me $0.99, and should be able to provide enough skirting for all of my vehicles. Look at some existing photographs. (see below)

An existing MCV-80 Warrior in Iraq.

I cut a total of 6 pieces of RPG skirting...one for each side, one for the rear, one for the front, and one for each side of the turret. I added short pieces of square plastic styrene strip to the back of the skirting so that it was offset from the hull by about 3/32". (except for the front piece.)
  
Side View


 The other side.


 The rear.

The front.

Overall, I like the addition of the skirting and may have to add some to my U.S. vehicles.