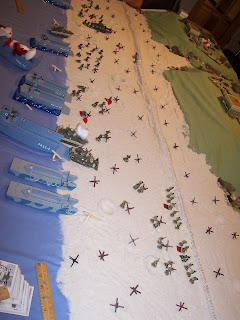
The terrain was quickly thrown together as I hadn't constructed my Atlantic Wall terrain yet. (Simple green sheets over stacked styrofoam, paper models of concrete bunkers, rocks, and some lichen.) We did however try a couple of different terrain techniques, such as using real sand (about 6 pounds of it) for the beach...sort of creating a mini-sand table. The terrain set up quickly, since I want to run this at future conventions. The Scenario is not an actual OOB, yet, but certainly gave the feel. The terrain was meant to represent the Omaha landing, somewhere between White and Green Beach, with three fortified bunkers and two draws into the terrain.
The Allied invasion started with about 10, 12-man units ('squads') in various landing craft, two engineering Shermans, and 3x DD Shermans with engineering units.
The German defenders started with about 4, 12-man units ('squads') with plenty of MG's, 3 AT guns in the bunkers, and plenty of defensive positions.
Here are some pictures of the game and the progress of the invasion:
Here's the initial setup form the west end of the beach. Note that the seawall was also 'formed' form the sand, so no extra terrain. There was also some crude barbed wire coils that I made the night before. Better barbed wire (with barbs) is coming soon. I've got lots of hedgehogs, most made with plastic-styrene angles glued at the proper angles.
Here's a look at the beach from the east end. Note the craters in the sand, created by making a little mound of sand, and then crushing it with a golf ball to make the crater with raised sides.
We never had to use it, but I had to take a picture of my P51's (1/72nd Corgi die cast) over the beach. See one of my recent posts on how I made the new flight stands.
Here was have the landing craft making their way to the beach in relatively good order. The middle LCM-3 is taking hits from a German mortar and causing many pains for the crew and landing party. One of the DD Shermans at the extreme left rolled badly and began to flood, creating a water obstacle for later landing craft. The tanks crew did manage to bail out successfully and hitch a ride on a passing LCVP heading back to the LST for the second wave.
The center units are taking a murderous fire form the German MG's above. Once DD tank is ashore while the Engineering Sherman prepares to land. The LCM-3 in the background is now sinking and ablaze with the entire landing party as a casualty. There were no survivors.
Here's another view of the entire beach. Alpha and Bravo company have reached the seawall in the foreground relatively unscathed. The Engineering Sherman dozer is on the beach. The DD Sherman that hit the beach took a critical hit to the engine from a German Pak-40. It will veer to the left and come to a stop...a mobility kill, and sitting duck. In the background, the other engineering unit, a Sherman Crab tank is on the beach flailing away. (However, the mines are on the 'other' side of the seawall !)
Several more units have made it to the seawall, however with fewer numbers than when they started. The Sherman crab is advancing as well as another DD Sherman, with AT shells falling around them both.
Another good view of the battle. Finally, one of the Shermans successfully placed a smoke round in front of the central bunker.
On the extreme left, the troops look at the draw they have to assault. They are keeping the dug-in Germans suppressed with gunfire.
On the extreme right, the troops are evaluating the draw they have to cross. German casualties are mounting and the MG fire is slackening from the heights.
The stationary troops along the seawall start putting together their bangalore torpedoes and strategically place them through the seawall. There will be a big 'bang' the next turn.
On the left, the engineering squad blows a hole in the seawall, and the Sherman crab proceeds through the breech. The infantry also proceeds as their exploded bangalores have created a line of rifle pits to enfilade the German rifles above.
Another view of the Allied left. A couple of straggling landing craft make it to shore with reinforcements to take advantage of the breach.
On the Allied right, they have blown three new breaches through the sea wall and the Sherman dozer is about ready to make a 4th. A few well placed shots and an HE round have all but silenced the German MG fire along this draw. Alpha and Bravo company should make it to the top of the defenses first. "Dog three is now open!"

Here's one last picture of the beach assault before the game was called as there were very few Germans left on the ridges to return fire. The Germans did well to inflict almost 70 casualties (53%), disable one DD-tank and sink one LCM-3. Fun was had by all, and with a couple of modifications, it should make for a lively convention game.


No comments:
Post a Comment